Posts

Matrix Synapse custom homeserver deploy

Image
  In previous post  Matrix server with self build Element-Web  was described a procedure how to prepare Linux server with local docker images registry. Now we use prepared infrastructure to deploy Synapse server from custom docker image built from source. Matrix is an open source project that publishes the Matrix open standard for secure, decentralized, real-time communication, and its Apache licensed reference implementations. Synapse: Matrix homeserver implementation developed by the matrix.org core team written in Python 3/Twisted. Get Synapse sources from github: $ git clone https://github.com/matrix-org/synapse Buildkit Synapse docker image build using BuildKit:  Build images with BuildKit Download latest BuildKit release from github:  BuildKit releases Unpack release binary archive to ./bin local directory: $ userrepo@repo :~$ ls -1 ./bin/ buildctl buildkitd ... Start BuildKit service: $ sudo buildkitd & Add  DOCKER_BUILDKIT  environment...

Matrix server with self build Element-Web

Image
This instruction describes how to run Matrix server with custom Element-Web client. Matrix  - Matrix is an open standard for interoperable, decentralized, real-time communication over IP. Element-Web  - A glossy Matrix collaboration client for the web. TL;DR On  repo  development server Clone Element-web source code: userrepo@repo :~$ git clone https://github.com/vector-im/element-web.git Change the code. Build new docker image (tag 0.1): userrepo@repo :~/element-web$ docker build -t repo:5000/myelement:0.1 . Upload created image to local registry: userrepo@repo :~$ docker push repo:5000/myelement:0.1 On  matrix  test server Execute ansible script for automatic build and deploy: root@matrix :~# ansible-playbook -i inventory/hosts setup.yml --tags=setup-all,start Prepare local docker registry and git server Configure local registry server OS name: userrepo@repo :~$ uname -a Linux repo 5.10.0-10-amd64 #1 SMP Debian 5.10.84-1 (2021-12-08) x86_64 GNU/Linux Co...

Risks of sale solutions based on Open source for small projects

Image
  Challenges  to push custom changes to main source code Core developers mightn’t approve including your changes to main branch. They may have their own rules and vision of product development, or your changes may be not corresponding to the main project goals. So, you need to maintain your custom branch by yourself. Then your changes will not be included to upstream and when new version will be released it will not contain your patches. You will need to patch all new versions again. Complexity of custom branch maintain Since bug fixes and securities patches are made in upstream only, you will need regularly merge changes from main branch to custom. Main code developing will become incompatible with custom changes and create conflicts in a code which hard to resolve. Totally separate from main code developing is too complicated. Core developers’ community could include large number of code contributors which may be much bigger than a local team. Also core development probably ...

MiVoice Office 400 - Routing over SIP-trunk

Image
 The pdf slides below describes a process of configuring routing on MiVO 430 PBX. M430 connected to MX-ONE PBX over SIP-trunk. You need to pass through several configuration screens to setup routing of incoming call and outgoing as well. Before that you need to make  MiVo 400 SIP-extension configuration . Routing over SIP-trunk slides ->  pdf

MX-ONE SIP-trunk tie-line with Private services

Image
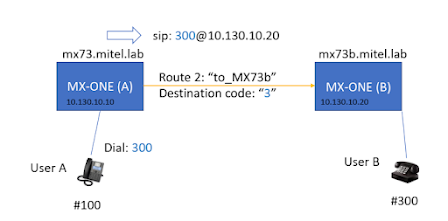
SIP-trunk tie-line used for Private networks, unlike to Public networks it could provide some extended telephone services, e.g. Callback (RFC 6910), Call Intrusion (RFC 3911, 5850) and other services over SIP-trunk. SIP tie-line could be used between two MX-ONEs or MX-ONE and another PBX with support of appropriate RFCs. Additionally MX-ONE supports some proprietary services.  Create a route towards another MX-ONE using "MX-ONE tieline" profile. Local and remote IP addresses and domain names should match each other in Route setting for MX-ONE (A) and MX-ONE (B). Route association ID should be the same on both sides. mxone_admin@mx73:~> sip_route -print -route 2 -short Route data for SIP destination route : 2   protocol       = udp   profile        = MXONE-tieline   service        = PRIVATE_SERVICES   uristring0     = sip:?@10.130.10.20;tgrp=2;trunk-context=mx73b.mitel.lab   fromur...

MiVoice Office 400 Conference bridge

Image
MiVo 400 PBX has build-in conference bridge. You could dial-in to a bridge number and enter PIN code to join a conference. SIP-subscribers should occupy DSP resources for VoIP calls. MiVo 415 could handle six parties conferences and have on board DSP for 3 VoIP/RTP streams. Additional DSP modules available for expansion resources.  Before start to enter a conference please check that voice prompts are uploaded to the PBX from vendor server. It could be done from MiVo 400 Web-admin interface. In order to create a conference room, you've need to activate Self Service Portal (SSP) for particular user in their permissions set and mark possibility to manage conferences. Then login to SSP with the user name and password (or PIN) and create new conference room. Default dial-in conference bridge number is #896. You will hear voice prompt to enter access code. Enter PIN code using DTMF over RTP mode on SIP-phones to join the conference. Please find pdf slides with detailed instructions -...

VoWLAN 5634 handset configuration with WinPDM

Image
Voice over WLAN (or VoWiFi) handset model: 5634 (WH2) could connect over wireless network to IP infrastructure and register on SIP proxy for making/receive calls. The best way to configure the phone is to connect it to PC over USB cradle (programmer) and configure using WinPDM java application. After installing WinPDM and connecting the phone, you will need to: - create new "Site" in the application, - import Parameter definitions file from SW bundle, - create new Template and configure Network and VoIP settings, - create new Number using the template above, - associate the number with device. The handset will syncing configuration with WinPDM, connect to WiFi network and register SIP extension. Please find pdf slides with detailed instructions -> pdf . The phone is successfully registered on Asterisk PBX.